mumumu の日記

Development, Translation, daily life, thoughts, and so on.

2013-07-04 18:01:00 +0900

dmidecode

http://www.nongnu.org/dmidecode/
http://man.cx/dmidecode%288%29

自作とかしてないと dmidecode とか使わないよなぁ、と心の隅に置いていただけのコマンドであるが、自分サーバ自作してたんだった(´ー`;)
オプションなしで実行すると山盛りの情報が出てくるので、--type だけはちゃんと覚えておこう。

-t, --type TYPE
    Only  display  the  entries  of type TYPE. TYPE can be either a DMI type number, or a comma-separated list of type numbers, or a
    keyword from the following list: bios, system, baseboard, chassis, processor, memory, cache, connector, slot. Refer to  the  DMI
    TYPES  section  below for details.  If this option is used more than once, the set of displayed entries will be the union of all
    the given types.  If TYPE is not provided or not valid, a list of all valid keywords is printed  and  dmidecode  exits  with  an
    error.

Thinkpad X230 でプロセッサ情報を見ると以下のようになる。

$ sudo dmidecode  --type processor
# dmidecode 2.11
SMBIOS 2.7 present.

Handle 0x0001, DMI type 4, 42 bytes
Processor Information
        Socket Designation: CPU Socket - U3E1
        Type: Central Processor
        Family: Core i5
        Manufacturer: Intel(R) Corporation
        ID: A9 06 03 00 FF FB EB BF
        Signature: Type 0, Family 6, Model 58, Stepping 9
        Flags:
                FPU (Floating-point unit on-chip)
                VME (Virtual mode extension)
                DE (Debugging extension)
                PSE (Page size extension)
                TSC (Time stamp counter)
                MSR (Model specific registers)
                PAE (Physical address extension)
                MCE (Machine check exception)
                CX8 (CMPXCHG8 instruction supported)
                APIC (On-chip APIC hardware supported)
                SEP (Fast system call)
                MTRR (Memory type range registers)
                PGE (Page global enable)
                MCA (Machine check architecture)
                CMOV (Conditional move instruction supported)
                PAT (Page attribute table)
                PSE-36 (36-bit page size extension)
                CLFSH (CLFLUSH instruction supported)
                DS (Debug store)
                ACPI (ACPI supported)
                MMX (MMX technology supported)
                FXSR (FXSAVE and FXSTOR instructions supported)
                SSE (Streaming SIMD extensions)
                SSE2 (Streaming SIMD extensions 2)
                SS (Self-snoop)
                HTT (Multi-threading)
                TM (Thermal monitor supported)
                PBE (Pending break enabled)
        Version: Intel(R) Core(TM) i5-3320M CPU @ 2.60GHz
        Voltage: 0.9 V
        External Clock: 100 MHz
        Max Speed: 2600 MHz
        Current Speed: 2600 MHz
        Status: Populated, Enabled
        Upgrade: Socket rPGA988B
        L1 Cache Handle: 0x0003
        L2 Cache Handle: 0x0004
        L3 Cache Handle: 0x0005
        Serial Number: None
        Asset Tag: None
        Part Number: None
        Core Count: 2
        Core Enabled: 2
        Thread Count: 4
        Characteristics:
                64-bit capable

メモリの情報は以下のような感じだ。現状 4G しか載ってないが最大16GBらしい。今度頼んでおこう(*´〜`)

$ sudo dmidecode  --type memory
# dmidecode 2.11
SMBIOS 2.7 present.

Handle 0x0007, DMI type 16, 23 bytes
Physical Memory Array
        Location: System Board Or Motherboard
        Use: System Memory
        Error Correction Type: None
        Maximum Capacity: 16 GB
        Error Information Handle: Not Provided
        Number Of Devices: 2

Handle 0x0008, DMI type 17, 34 bytes
Memory Device
        Array Handle: 0x0007
        Error Information Handle: Not Provided
        Total Width: 64 bits
        Data Width: 64 bits
        Size: 4096 MB
        Form Factor: SODIMM
        Set: None
        Locator: ChannelA-DIMM0
        Bank Locator: BANK 0
        Type: DDR3
        Type Detail: Synchronous
        Speed: 1600 MHz
        Manufacturer: Hynix/Hyundai
        Serial Number: 1082DC09
        Asset Tag: None
        Part Number: HMT351S6CFR8C-PB  
        Rank: Unknown
        Configured Clock Speed: 1600 MHz

Handle 0x0009, DMI type 17, 34 bytes
Memory Device
        Array Handle: 0x0007
        Error Information Handle: Not Provided
        Total Width: Unknown
        Data Width: Unknown
        Size: No Module Installed
        Form Factor: DIMM
        Set: None
        Locator: ChannelB-DIMM0
        Bank Locator: BANK 2
        Type: Unknown
        Type Detail: None
        Speed: Unknown
        Manufacturer: Not Specified
        Serial Number: Not Specified
        Asset Tag: None
        Part Number: Not Specified
        Rank: Unknown
        Configured Clock Speed: Unknown
2013-07-01 11:13:00 +0900

New environment

今日から新しい職場だ。とはいえ、よくある「XXXに入社しました!」とかいうエントリにはしない。
自分の軸をブレさせることなく頑張る。それだけだ。

新しい仕事は新しい車に似ている。その車を買った翌朝は、ただ嬉しい。ガレージに停まっているのを見るだけで「ああ、新車だ。素晴らしい。何もかも新しい」そう思って感激する。しかし、車に乗り込んで実際に走らせてみると、はじめのう ちは、新車の匂いを感じて満足しているけれど、しばらくすると気づくのだ、「新車といえども車は車だ」と。 転職先も同じである。新しい、というのはそれだけでいいように思えるが、新しさはすぐに失われる。新しさとは別の、独自の価値があるかどうかが大切である。もちろん、独自の価値、と一口に言っても、その種類は様々だろう。

(...中略)

会社に独自の価値があるか、また、その価値とは何かがわかれば、次に問うべきことは、「そこで本当に自分のやりたいことができるか」である。むしろこの方が重要な問いだろう。それが自分の将来を左右する。また、この問いに答えるには、自 分が本当にやりたいことは何かを考えなくてはならない。
(Being Geek ギークであり続けるためのキャリア戦略
P28. 「キャリアの形成」から引用)

2013-06-30 14:52:00 +0900

Very simple chrome extension for delicious.com

https://github.com/mumumu/simple-delicious-extension

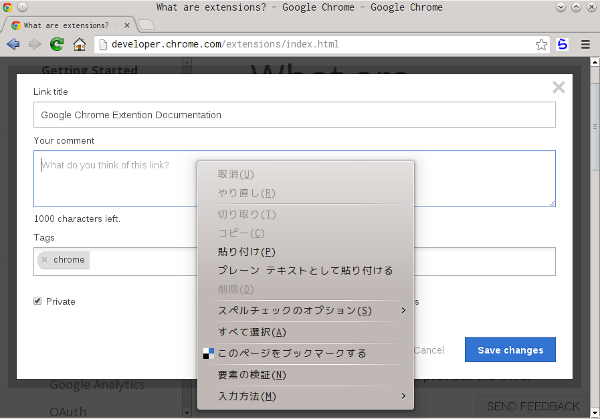
前のエントリでも触れた通り、delicious.com のブラウザ拡張はカオスである。俺はシンプルに右クリックしてブックマークを保存したいだけなのに! と思ってかっとなって拡張を書いた。

だが、よーく探してみると同じ実装してる拡張 があったwww

screenshot

ひどいオチだが、まぁ Google Chrome Extention の良い勉強になった、ということにしておく(*´〜`)

2013-06-28 18:09:00 +0900

phpenv without php-build

https://github.com/phpenv/phpenv

来週から Python を仕事で使うというのに、未だに PHP ばかりやっている mumumu です。こんばんは。

さて、複数の PHP のバージョンをひとつのマシンに共存させ、使い分けたいと思った場合に、現在は CHH 版の phpenv が広まっているような気がする。けれども、自分は Ruby の複数バージョン共存に rbenv を使っているので、それと同じように使える phpenv/phpenv を使ってみたら思ったより便利だったので、ここで紹介する。


ここでは、Ubuntu 12.10 (Quantal Quetzal) で、Apache2 のモジュールとしてPHPを複数共存させる手順を以下に示す。まずはインストールから。

$ git clone git://github.com/phpenv/phpenv.git .phpenv
$ echo 'export PATH="$HOME/.phpenv/bin:$PATH"' >> ~/.bashrc
$ echo 'eval "$(phpenv init -)"' >> ~/.bashrc
$ . ~/.bashrc

これで完了。以下のように出れば成功である。

$ phpenv rehash
phpenv v0.0.3-dev

インストール可能なバージョンを出してみる。github の php-src をベースとしたバージョンが全てビルド可能であることが示されるはずだ。

$ phpenv install --releases
phpenv v0.0.3-dev

             init extensions  the clone source for additional extensions                      
             init  the cloning source from php-src Github repo                     
             Fetching  the latest PHP releases from Github repohpenv install --releases

PHP releases as were available on:
2013年  6月 28日 金曜日 18:49:23 JST

php-5.5.0
php-5.5.0RC1
php-5.5.0RC2
php-5.5.0RC3
php-5.5.0alpha1
php-5.5.0alpha2

...

php-5.4.17RC1
php-5.4.16

... 

PHP を Apacheモジュールとしてインストールしたことがある人なら御存知の通り、Linux での PHP のビルドには Apache モジュールをビルドするための apxs2、そして bison(re2c) 、Cコンパイラその他が必要なことは御存知な通りである。そこで、自分が必要なモノをここでインストールしておく。libcurl4, libreadlineとか、libxslt は自分がいつも設定しているモノなので正直適当である。

$ sudo apt-get install build-essential apache2-mpm-prefork apache2-prefork-dev bison re2c libxml2-dev libcurl4-openssl-dev libmcrypt-dev libreadline-dev libxslt-dev

さて、各バージョンのビルドである。ビルドオプションは各バージョンでコントロールできる。また、同じバージョンだが、ビルドオプションが違う複数のPHPをインストールすることもできる。ここでは、PHP 5.5.0 をインストールするので、それ用のオプションを設定しよう。

$ cd ~/.phpenv/etc
$ vi php-5.5.Linux.source 

自分は以下のように設定した。はっきりいって適当である。ここは適宜調整し、ビルドに必要なヘッダファイルは適宜入れてください。

あと、xdebug とかをデフォルトで入れようとしてくれるので、それはコメントアウトした。

CONFIGURE_OPTIONS="--with-apxs2=/usr/bin/apxs2
                   --enable-zend-multibyte
                   --enable-phar
                   --disable-intl
                   --with-libxml
                   --with-openssl
                   --with-kerberos=/usr
                   --with-zlib
                   --enable-mbstring
                   --enable-mbregex
                   --with-xmlrpc
                   --with-xsl
                   --with-pcre-regex
                   --with-curl
                   --with-mcrypt
                   --with-gettext
                   --with-mysql
                   --with-mysqli
                   --with-pdo-mysql
                   --with-readline
                   "

#MANUAL_EXTENSIONS=('http' 'uri-template' 'xdebug')

そしてビルドし、インストールする。 成功したら、以下のように出るはずだ。

$ phpenv install php-5.5.0

               [Fetching] |1| latest code from Github repo                                 
               [Branching] |2| for a clean build environment                                
               [Patching] |3| Applying patches to the source if any are applicable.        
               [Configuring] |4| build options for selected release                           
               [Compiling] |5| /home/mumumu/.phpenv/versions/5.5.0                          
               make: success                                                          
               make install: success                                                          
               make clean: success                                                          
               [Config ini] |6| appending add-on extention configuration to php.ini          
                   [Pyrus] |7| downloading and installing from http://pear2.php.net/pyrus.phar
               [Extensions] |8| No additional extensions configured for manual installation. 
                   Success: The installation of the php-5.5.0 release was successfully completed.
                   Info: The log files produced by the procedure are available, in the tmp folder, for your review:
                   - Any warnings or messages sent to STDERR was logged to /tmp/phpenv-install-php-5.5.0.20130628182515.log.err
                   - All messages sent to STDOUT was logged to /tmp/phpenv-install-php-5.5.0.20130628182515.log

インストールできたら、このマシンでは PHP 5.5.0 をメインで使う旨宣言する。

$ phpenv global 5.5.0
phpenv v0.0.3-dev

5.5.0
$ php --version
PHP 5.5.0 (cli) (built with phpenv v0.0.2: Jun 28 2013 18:31:35) 
Copyright (c) 1997-2013 The PHP Group
Zend Engine v2.5.0-dev, Copyright (c) 1998-2013 Zend Technologies

おっ、そういえば PHP 5.5.0 からは OPcache がデフォルトでビルドされるんだった。それも組み込んでおこう。php.ini もバージョン毎に使い分けができる

$ cd ~/.phpenv/versions/5.5.0/etc/php.ini

上記に以下を書き加えよう。

zend_extension=/home/mumumu/.phpenv/versions/5.5.0/lib/php/extensions/no-debug-non-zts-20121212/opcache.so
opcache.memory_consumption=128
opcache.interned_strings_buffer=8
opcache.max_accelerated_files=4000
opcache.revalidate_freq=60
opcache.fast_shutdown=1
opcache.enable_cli=1

書き加えてバージョンを確かめると以下のようになる。

$ php --version
PHP 5.5.0 (cli) (built with phpenv v0.0.2: Jun 28 2013 18:31:35) 
Copyright (c) 1997-2013 The PHP Group
Zend Engine v2.5.0-dev, Copyright (c) 1998-2013 Zend Technologies
    with Zend OPcache v7.0.2-dev, Copyright (c) 1999-2013, by Zend Technologie

Apache モジュールも入っている。これは各バージョンの libexec ディレクトリ以下に入っているので、それを httpd.conf で切り替えれば Apache でのバージョンの切り替えも可能だ。

$ ls ~/.phpenv/versions/5.5.0/libexec
libphp5.so

次に、PHP 5.5.0 をデバッグビルドして共存させてみる。ビルドの設定ファイルをコピーし、設定すればよいのだが、設定ファイルは <php major release>-<optional specific build>.<platform>.source という規約に従う必要がある。

ここでは、PHP 5.5.0 のデバッグ版であることを示すために、optional specific build の部分を 550debug としている。ここでは、--enable-debug をオプションに加える。

$ cd ~/.phpenv/etc/
$ cp php-5.5.Linux.source php-5.5-550debug.Linux.source

そしてインストールする。optional specific build をオプションとして指定し、さっき編集した設定ファイルが使われていることを確かめよう。

$ phpenv install php-5.5.0 550debug
phpenv v0.0.3-dev

Building 5.5.0-550debug with config options from: php-5.5-550debug.Linux.source
....

ビルドが終わると、ふたつのバージョンが入っていることがわかる。

$ phpenv versions
phpenv v0.0.3-dev

* 5.5.0 (set by /home/mumumu/.phpenv/version)
  5.5.0-550debug

最後に、5.5.0 のデバッグ版に切り替え、コンパイルオプションを確かめる。--enable-debug が加わっていること、デバッグ版としてバージョンが出ていることがわかる。

$ phpenv local 5.5.0-550debug
$ php --version
PHP 5.5.0 (cli) (built with phpenv v0.0.2: Jun 28 2013 19:27:20) (DEBUG)
Copyright (c) 1997-2013 The PHP Group
Zend Engine v2.5.0-dev, Copyright (c) 1998-2013 Zend Technologies
$ php -i | grep configure
Configure Command =>  './configure'  '--with-apxs2=/usr/bin/apxs2' '--enable-zend-multibyte' '--enable-phar' '--disable-intl' '--with-libxml' '--with-openssl' '--with-kerberos=/usr' '--with-zlib' '--enable-mbstring' '--enable-mbregex' '--with-xmlrpc' '--with-xsl' '--with-pcre-regex' '--with-curl' '--with-mcrypt' '--with-gettext' '--with-mysql' '--with-mysqli' '--with-pdo-mysql' '--with-readline' '--enable-debug' '--with-config-file-path=/home/mumumu/.phpenv/versions/5.5.0-550debug/etc' '--with-config-file-scan-dir=/home/mumumu/.phpenv/versions/5.5.0-550debug/etc/conf.d' '--prefix=/home/mumumu/.phpenv/versions/5.5.0-550debug'


こんな感じだ。自分の中では rbenv と同じ感じで使えて、Apache モジュールの切り替えもうまいこといったのでいい感じである。また、同じバージョンで複数のビルドも共存できる。使っていて楽しい。